Monday, December 25, 2006

Interlude #2 - The Snuglet Adventure Continues...

Merry Christmas everyone!!!

Boy! Keeping up with timely posts is harder than I thought!!

I've now made a total of 8 snuglets. Along the way, I experimented with different ways to get the corners done so that they 1) look nice and 2) aren't terribly thick to sew through.

I think I finally have it, although it took me a few tries to get there.

Here's a rundown of the progression:

Snuglet #2: At first I tried a mitering technique that's in the Reader's Digest New Complete Guide to Sewing. The mitering part worked just fine. However, their technique, as written, didn't allow me to double fold the edges - they were folded once only. Since I had gotten in my head that I wanted the raw edges bound, this wasn't going to work. (And I'll be the first to admit that I'm probably being overly picky about the whole raw edge thing).

The corners on this one ended up being sort of mitered because I had to cut the one of the corners to do the experiment. I cut each of the corners, then folded the edges twice. The result was that the corners fit nicely, but with a bit of a gap in the corner where one fold met the other fold. This as opposed to the nicely sewn corner that the original mitering technique would have given. To fix this, I stitched the two edges together and in such a way that it showed on the right side.

Here's the corner as seen from the wrong side:

Here's the corner as seen from the right side:

All in all, not perfect, but doable.


Snuglet #3: With this one, I set aside the mitering idea and played with cutting out some of the corner so that they could be folded without overlapping in the corners. This idea mostly worked. However, it also had a gap in the corner area that had to be sewn up.

Snuglet #4: I went back to the mitering idea but this time, tried to come up with a way where I could get the mitered corner sewn nicely AND get the edges double folded. And HEY! I figured it out! In short, the way to do it is to partially sew up the corner, then leave the rest to be folded under.


Whew!!!

Sunday, November 26, 2006

Interlude #1 - The "Snuglet"

I would really like to get my blog up-to-date with projects I've already done, but in the meantime, I continue to work on other projects... and so get farther behind on my blogging.

And so we have interlude #1...

Thanksgiving has come and gone, and the Christmas season, aka FRENZY, is upon us. I frequently have a tough time thinking of things to get anyone but my own immediate family, but this year, I think I have the answer.

It's called a "Snuglet" (or Slanket) and it's a blanket with sleeves. I got the idea from a review on http://www.patternreview.com/ . You can see the review here: Snuglet Review. The review includes a link to some very good instructions on how to make a Snuglet.

I liked the idea so much (after all WHO could object to getting a warm snuggly blanket for Christmas?), that for the first time in my life, I made it a point to go to an after Thanksgiving sale. Not on Black Friday... OH NO! Well, I would have gone then, but the fabric I wanted was not on sale on Friday, it was on sale Saturday.

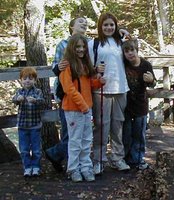
I went hiking with the family on Friday instead. A much more pleasant pastime for me than fighting the shopping crowds. We took a couple of nephews and a niece, along with our two munchkins to a place called Leon Sinks for a 5 mile walk.

On Saturday morning, I got up bright and early, grabbed the younger of my munchkins and went on a fleece fabric mission to Joann's. Altogether, I purchased 28 yards of fleece with various patterns, so I'm glad I went while it was on sale!

After I got home, I spent the afternoon washing all that fleece. (As I understand it, material made of polyester doesn't need to be pre-shrunk. But, I didn't like the "store" smell of the fabric, so I washed it all).

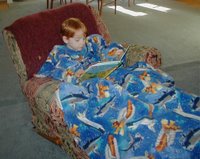
I also started on my first practice snuglet. It looked like an easy enough project to do, and so it was. I finished up the first one this afteroon. Doesn't it look snuggly???

It probably took a total of an an hour-and-a-half to two hours to complete. I'll probably be able to cut it down to an hour or so now that I've got the process down.

I folded the edges twice to bind the edges which made for very, very thick corners. I think I will experiment on the next one to see if I can reduce the bulk by mitering the corners.

Gotta get back to it, I have about 6 more of these to make before Christmas!!!

Friday, November 10, 2006

The Adventure Begins - Part 2

When I bought my sewing machine, I also bought some fabric, thread, notions, and a few patterns. I had gone hunting on the web for patterns and knew already what I wanted to start with.

I started with these patterns:

By the time I bought my sewing machine, I had already purchased The Reader's Digest New Complete Guide to Sewing, and had started reading through it. I had also found a FANTASTIC source for information; a web site called PatternReview.com. The Guide to Sewing is a pretty good book for someone new to sewing. I have referred back to it a number of times along the way.

The website though is marvelous. The name may be PatternReview, but there's much more there than just pattern reviews. The site members review books, websites, notions, stores, sewing machines, sergers, etc. They also have a message board, a searchable knowledge base, a place to request reviews, a place to save patterns you have, a wishlist for patterns you want, etc. (Note that some of their services are provided for a fee. It's less than $30 a year. Access to something like 6 months or a year's worth of pattern reviews is free.)

Since I've found this website, I've visited it almost everyday. And I've posted reviews of some of my projects. Reading about what other people have tried has been a great source of information and inspiration. I get to see everything from the most advanced sewing, to a little 9-year-old's beginning efforts.

So anyway, with my materials and sources of info in hand, I went to work. And the first try was not so bad...

But more on that the next time.

Sunday, November 05, 2006

The Adventure Begins - Part 1

So, you might be asking yourself, why would a 38 year old woman take up sewing as a hobby, and garment sewing at that? OK, maybe you wouldn't be asking yourself that, but I'm gonna tell you anyway.

I've always enjoyed doing "crafty things". When I was about 5, I made potholders with a potholder loom and sold them around the neighborhood. Over the years, I've done needlepoint, crochet (regular and thread), knitting, that kind of thing. But I tend to rotate through them, and can never seem to finish any one project very quickly. Most of my medium to large projects have taken me years to complete. In fact, I have a few ones still outstanding.

In that time, I've done very, very little sewing. It's kind of odd really; my grandmother sewed. My mom did some sewing too, AND she fixed sewing machines at Sears. So, while I did learn how to work a sewing machine and even got far enough with sewing to make a pair of crop pants when I was 13 or 14, it never really took.

I think part of the reason was that I was intimidated by it. I thought it would be difficult to learn, and then there's the start up cost. A crochet hook and a skein of yarn costs maybe $5. But even an inexpensive sewing machine costs $100+.

A while back though, we started having dinner every other week at my in-laws. My DMIL is the SWEETEST woman in the world and knows ALL of the nearly forgotten home skills; she still makes biscuits from scratch, she cans her own veggies, and she still sews.

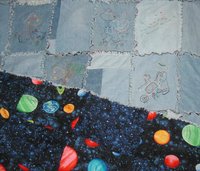
Our bi-weekly visits turned into a great excuse to work on different projects. The first project we worked on was a patch-work blanket for my son (she's ALWAYS, ALWAYS working on something or another for the grandkids). We did one side in denim squares with embroidery on some of them, and the other in squares using a space theme (OK, the two sides don't exactly match - but it's a great blanket for all that!). With her to help push me along, we got that done in pretty good time.

In the middle of that project, she made a circle skirt and a gypsy costume for my daughter.

Between helping her out with my son's blanket, and watching how she did my daughter's outfits, I got bitten by the bug. And as she is quite the sweetest woman in the world, she readily agreed to help me learn how to sew clothes.

So, I investigated sewing machines online, and patterns too. I picked what I wanted, and on July 4th, 2006, I went to WalMart and bought my first sewing machine. It's a Brother C6000i - nothing real fancy, but it's been a great starter machine so far. At the same time, I bought a few different patterns, and some material to get started with.

Then, I started sewing... whew!!! I think I'll save that for Part 2!

Thursday, November 02, 2006

Welcome to my blog!

It seems everyone has a blog these days . I didn't really intend to start a blog - I've never been one for doing a lot of journaling. But, along came a new hobby and I changed my mind.

My new hobby is sewing - garment sewing that is. And I'm enjoying the heck out of it. For my first few projects, I've kept notes in a little notebook - what alterations I've made, what size I used, a little swatch of fabric - that kind of thing.

But now I'm starting on a project that promises to have many stages and will take a couple of months at least to complete. I found I wanted something more techie than a notebook (I do like my tech after all), and one where I could more easily share my thoughts, accomplishments and frustrations, AND pictures of the process and final product.

My goal is simply one of sharing the adventure. It ain't mountain climbing! But it does have its opportunities to explore and challenges to overcome.

So here it is - Janimé's Sewing Adventures. If you find it remotely interesting, Cool! If not, well that's OK too.