Saturday, February 08, 2014


Sunday, March 30, 2008
This is (one reason) why I make muslins
Here's what reminded me of it:
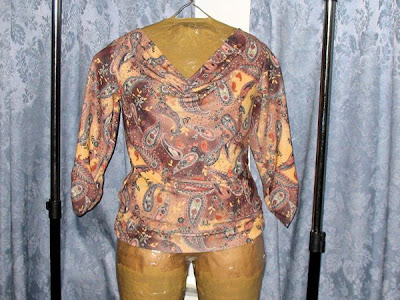
This is my muslin version of Simplicity 3536 - View A. I'll do a more formal review later, but I wanted to address the muslin aspect of this project.
Why? Because I'm stopping with the muslin. I will not be moving on to using the very yummy fashion fabic I had in mind to go with this pattern.
Why? Because after making the muslin, it became very clear that I would not be happy with the outcome.
Who cares? Ummm, I care. Who wants a blouse they don't really like? Actually, I like the blouse. I just don't like how it looks on me!
This particular project reinforces the notion for me that muslins are the way to go. I was pretty disappointed in how this turned out. But no where near as disappointed and unhappy as I would have been if I had "made it for real" and had been as displeased in the results.
Ah, I can hear you now. "But Janimé, isn't this in contradiction to previous posts you've made about not waiting for perfection, or being open to new ideas and experimentation"?
I don't think it's a contradiction. Making muslins is how I keep the door open to new ideas and experimenation, frankly without busting the budget. I can't have too many failed experiments with $8 to $10 per yard fabric, or I won't be able to keep sewing. (YIKES!!!! EEEK!!!! even the thought of not sewing is horrid!).
Saturday, January 05, 2008
Intimidating Inspiration
But quite honestly, there are times when I find that "inspiration" becomes "intimidation".
I look at something and marvel at the skill it took to make and think to myself, there's no way in Hades I will ever be able to make something that good.
At that point, inspriation very nearly becomes intimidation. And I find myself becoming a little reluctant to try my hand at making those wonderful and beautiful things. And I get a little sad face :-(
I know the answer of course. Buck up! Give it a try! Learn!
Those people who can do wonderful things with fabric and thread, yarns and needles, beads, wood, cars, houses, furniture, canvas, notes, computers and whatever didn't start out that way. They started out knowing NOTHING about those things and built their skills up over time. They played. They experimented. They messed up on occasion.
So you newbies out there, and even you not so newbies, take your inspiration for what it's meant to be - inspriation.
Now go out there and TRY something NEW! :-)
Sunday, June 10, 2007
Focus your mind...
So, here are my top goals, pretty much in order.
Goal #1: Continue to work on fitting issues
My body is definitely not "ideal". And now that I sew, I think I can fix a lot of the problems I've had over the years with RTW clothing (YEA!!!)
Goal #2: Learn how to make pants
This folds right in with goal #1. My non-ideal shape makes it difficult to find pants that really fit. You folks who analyze clothing fit for fun would have a field day with me! :) I've made a simple pair of drawstring capri pants (Simplicity 5562), and feel like the tinkering I did on those worked well. Now I'm ready to move on to making pants with zippers and real waistbands.
Goal #3: Sew more for my family
I really want to get into making things for DH and the kiddies. DH is especially interested in having me try outdoor/camping/hiking clothing.
Goal #4: Embellish, embellish, embellish
After I started sewing, I started paying a LOT more attention to what other people wear. And I've noticed that in many instances, when I say to myself, "hey, I like that", some sort of embellishment is involved.
That's still an awful lot to get done, but trust me when I say that's narrowing it down quite a bit!
So do you have goals for your sewing?
Sunday, May 27, 2007
Introducing Bessy
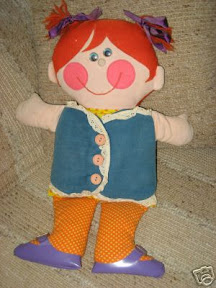
Remember this little gal from the 1970's? I had one. She and my Pooh Bear were my constant companions when I was little. I LOVED them! She still reminds me of me. Bad fashion sense, red round cheeks, and all.
 To make the dress form, I mostly followed the instructions as per an article in SewNews: Sewing Stunt Double. I made one big change though - I wanted a dress form with legs since I don't wear dresses all that much. Weddings and interviews have been it as of late. (Although, with all the cute dresses I've seen all the sewists make this year, that may change.)


 DS is an artistic photographer with the point of view of a 6 year old (because he is one). He was completely fascinated with the inside of the dress form and decided it needed a few pics too.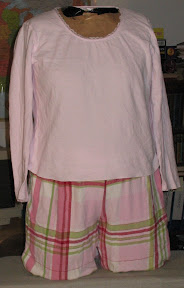

Sunday, May 13, 2007
Simplicity 4096 - View A - Muslin #1
I got to spend my day sewing. I started Simplicity 4096 - View A - Wrap top a couple of weeks ago and finished up the first muslin today.
I say first muslin because there is going to have to be at least one more.
Lesson #1: Pay attention to those reviews on Pattern Review.
I had read through a number of reviews on this pattern, but the part about there being a lot of ease in this view didn't stick. So, the top part of the top is about 4 sizes to big. Talk about a gaping mess!!!
It's so bad I can't even put a picture of it up - wouldn't be decent.
I did try out an idea for the side gathering which I think I will use again. Instead of using gathering stitches to gather the runched side, I used clear elastic tape pulled relatively taut to create the gathers. I think this worked pretty well and made the gathers more even than I could have done otherwise. I'll take a few pics on the next try to show what I did.
Sunday, April 22, 2007
Simplicity 4076 - View D - Paisley version
This version gave me quite a bit more trouble than the muslin version.
You can't see it very well in the picture, but the neck line is stretched out compared with the muslin's neckline. It's wearable, but only just. Also, the gathering in front didn't stick very well. It got rather smooshed out. There
 are still a few gathers there, but they almost look like mistakes, rather than something done intentionally.
There were two things that messed me up. One was the fabric itself. The buttermilk was far more stretchy than the interlock I used for the muslin. I spent quite a bit of time futzing with my needles and tension settings on scraps before I even started. And as I went along, I used various techniques to keep the stretching to a minimum.
Alas, the careful preparation and execution did not quite do the trick this time, in part because of the second thing that messed me up. My serger went wanky on me in the middle of sewing the neckband on. The far left thread tightened on the spool and broke (yes I had the cap thingy on to help prevent that sort of thing from happening) .
I finished serging with 3 threads, but had to go back over it with the sewing machine because the other needle thread was not the right color. That'll teach me to use the correct color only on the left-hand needle. By the time I finished with all this messing about, the neckline had gotten good and stretched out.
I was fairly bummed about it. I spent more on this buttermilk than I have on any other fabric before and to have the first project go astray is a little disheartening. Especially when I had done so much to make sure it would turn out well.
I had everything complete but the hems last Sunday, but dawdled all week because I wasn't happy with how it turned out. But, I finally finished it all up last night and it's grown on me a bit more. I'm still not completely happy with how the neckline sits - the stretching has made the top part a little large. But it's wearable, and that's a good thing.
Monday, March 19, 2007
Forgot a rule...
This is more of a goal than a rule. I really like the idea of being able to pick my choice of fabric and styles, so I've held off buying myself new tops as an incentive to make them. Two tops out of my staple wardrobe are things I've made myself and I'm pretty happy about that. Slacks will hopefully come later.
Sewing Rules...
Janimé's Rules for Sewing:
#1 Keep a small stash
Given adequate space and $s, this one would go by the wayside. But, I don't have a lot of space to work with. And I don't have a big budget either. It would be so, so easy to just go crazy over beautiful fabric and never get around to using it.
Been there, done that. I have some crochet thread that's been around for 15 to 20 years. I thought about ditching that stuff in favor of fabric until I read that crochet thread could be used in the serger.
But this rule, and others, helps me ensure that I spend my money wisely and actually get wearable garments out of the deal.
Current stash yardage? Approximately 35 yards.
#2 No UFOs
I have enough of these from other craft endeavors. But it also goes with the first rule. Part of what I want to accomplish is to have stuff I can wear. You can't really wear UFOs.
Current UFO count? Two. Sort of. Both are jackets that I made up muslins for and neither worked out on the first attempt. I want to work on the basics more before I tackle either pattern again.
#3 Must have patterns for fabric and vice versa
Seeing a trend here? I neither want patterns nor fabric hanging around waiting for inspiration from me. That doesn't mean I won't ever get one without the other. But so far, I've pretty much had something definite in mind when purchasing either.
#4 One project at a time
This is one way in which I keep myself from having UFOs hanging about. But it's not a strict rule. There is value in thinking ahead to the next project (or projects) and having a few items in the pipepline. My sewing time is limited though and I don't want to lose focus by trying to bounce between too many things.
I have helped myself out by putting a project plan together that holds my current and future projects. (I'm using Microsoft Project for that). This is probably overkill for most people, but it helps me stay very focused on what steps I need to take next, while allowing me the flexibility to get future projects lined up.
So what are your favorite sewing rules?
Thursday, February 15, 2007
Paperclips
I have a couple reasons for this. First, some fabrics just don't take pinning well, and I want to learn a method for handling those.
Second, I want to keep my patterns in good shape and multiple pinnings do take their toll.
I've gone back and forth with using pins, using weights, and using a combination of the two.
Part of challenge is my cutting method and mat. I don't cut very well with scissors. I'm just not very good at it. I much prefer using a rotary cutter. I'm able to control that better and end up with much nicer lines. So, I use a self healing mat along with my rotary cutter to cut fabric.
The problem is that my mat is fairly small - usually smaller than the pieces I'm cutting. So I have to move the mat as I'm cutting. Pins handle this fairly well. Weights are trickier. On my initial attempts, the fabric would slip around at bit as I was moving things around if I did not put in at least a few pins to anchor things down.
I recently read a thread somewhere on PatternReview about using clips to anchor fabric instead of pins. I wish I could find the thread again, but I can't. But it did get me to thinking and I decided to try to use a combination of paperclips and weights to see if that would work.
First, I set the pattern down on the fabric and held it there with weights:

In case you're wondering, those are pieces of petrified wood that I'm using as weights.
Then, I cut along the bottom and sides as far as my mat let me. After that, I carefully papercliped the fabric and the pattern edges together. Then I slid my mat over and finished the rest of the cutting for that piece. 
The fabric still slid up a bit as I moved the mat, but with the paper clips there, I was able to smooth it back out again. BTW, I tried this with fairly slippery fabric.
How did it turn out? There was at least one problem; the end points of the paper clips would sometimes catch on the fabric if I wasn't careful in removing them. It also seems like the fabric moved around too much in general.
The more things I try in my efforts to make cutting and marking more precise, the more I think that the ultimate solution will be to get a larger mat! But this little technique may tide me over for a while.
Sunday, January 28, 2007
Simplicity 5562 - Drawstring Pants - 1st Project - Completed July 2006
Before I took up sewing in July 2006, the only garment I had ever made was a pair of elastic-waist crop pants that I made when I was in my early teens.
So for my first project, I went for crop pants again, using Simplicity pattern #5562. I made View C.
This was one of several patterns that I found by going through Simplicity's online catalog. I really like being able to search for patterns that way, versus having to go to a fabric store and troll through the paper catalogs.
One thing you get with the Simplicity site is a very nice "Design" view of the pattern. With it, you can see the front design picture, line drawings of the front and back, and a view of the back of the envelope. For the last, you will need the Adobe Reader installed on your computer.
With that information, I was able to get an idea of the size I would need, and the amount of fabric I would need.
Lesson #1 - Don't let the pattern sizes throw you!!!!
I had a rough idea of my measurements when I started and OMG!!!! According to those, I needed to get a size 20!!!! I figured "Holy Smokes! That can't be right!".
Well my friends, it is right - well mostly right anyway. There is a standard sizing method that all the major pattern makers (and most of the independents too) use to size their patterns. The result is that the size you need to get in a pattern rarely matches what you normally get in a RTW (Ready-To-Wear) garment.
Sometimes the size you need will be smaller. Most of the time though, I think people find their pattern size is larger than their RTW size (mostly because of RTW "vanity" sizing). The best advice I've heard for this is to buy the size you need. You're making the garment yourself - no one need ever know what size you used to get there.
I ended up going with a size that was closer to my RTW size (size 16). As it turned out, it was the right size to get, but for the wrong reasons. I didn't learn about why until after this project was done though.
I picked my initial set of patterns up at WalMart. While I was there, I picked out some fabric for the project. My DMIL had made my DD a cute little circle skirt out of a fabric with a butterfly print. There were two variations of that fabric available and I purchased some with a blue background (my DD's has a black background).
Oh yeah, and I picked up my sewing machine too while I was there. :)
Lesson #2a - Read the instructions...
With this first project, my goal was get through the basics. So I read the instructions beforehand very thoroughly and followed them very closely during construction. The only thing I changed was the pockets.
Lesson #2b - but feel free to deviate as needed or desired
I wanted the leg finishing on View C, but not the cargo style pockets. The pockets I wanted were in View D. It looked like a simple enough change to make and it indeed turned out to be relatively simple. When doing this sort of thing, you want to be sure to notate the changes, or mark them directly on your pattern instructions. That way you don't get lost in the middle of construction.
With one slight exception, this pattern turned out to be a great beginning pattern to work with. I knew a little about sewing before I started, and the instructions were pretty complete and complimented what knowledge I had very well. The pants are fairly loose and the pattern seems to forgive slight mistakes easily. So this is definitely a pattern to try out early on in your sewing adventure.
Lesson #3 - However, pattern instructions are not always perfect.
About the one problem I had. I did not understand the instructions for putting the back pocket together. I ended up with something that looked wrong to me. Instead of the pocket top having a nice fold, I ended up with a "mini-pocket" inside the main pocket. I have yet to figure out if the problem is with the instructions, or with me.
So, you might be asking, how did they turn out? I thought the pants themselves turned out well, especially for a first attempt.

However, as you can see from the picture, they don't fit as well as they could. The pattern says that the waistline falls 1 inch below the natural waistline. As my body proportions are not "average" the waist is lower on me. I also have a bubble-butt, so the waist in the back tends to pull down quite a lot when I sit down. Lastly, the leg bottoms came out a little wide for my taste.
Let's just say that making these pointed out to me very quickly that I was going to need to do more than just follow patterns out of envelope.
Overall though, I really enjoyed the experience. I found I that really like that sewing projects have multiple steps with tasks that are sufficiently different to keep the whole thing interesting. I have other craft hobbies, such as crocheting and knitting, but I tend to pick those projects up and put them down over the course of years because much of the work is really repetitive.
I can certainly say that this project was enough to put me fully on the path of becoming a sewing junkie!
Wednesday, January 24, 2007
Don't Wait for Perfection...
So here it is, not well thought out, but down on paper, as it were.
Don't wait for perfection.
As a beginning sewist, I find myself struggling with perfectionism. I don't want to start a project until I know I can finish it successfully. I want to know at the beginning that everything is just right, even before I start a muslin.
But I'm not "good" at sewing yet. Sewing, like all skills, has to be practiced. Not only that, but sometimes, the mistakes you make become the best learning opportunities you will ever get. Lastly, when we make mistakes in sewing, as with so many other things, we get the chance to exercise our creativity by figuring out how to turn that loss into a win.
Just something to think about.
Thinking "Outside the Box"
Then I realized, I didn't do it because I thought there might be a reason why I shouldn't. It was "against the rules".
Now I break sewing "rules" all the time. Most are just guidelines anyway - and there are no sewing police that are going to hunt you down when you don't follow them.
But for whatever reason, I went conformist on this particular item.
"Thinking Outside the Box" is one of those buzzwordy phrases that get way overused. But in this case, it's appropriate.
When it comes to sewing, it's perfectly OK, even proper, to think "Outside the Box". I just bet you'll get some of your best ideas that way. :)
Friday, January 19, 2007
Let's go backpacking!!!! AGAIN!!!!!!
Well, we went on our short backpacking trip last weekend. It was not a bad trip, but I'm a little done in for a while. My DH, however, is not. He's raring to go again already, and has another trip planned for this weekend. My DD and I are taking a pass, but my DS wants to go with Dad.
So, sometime Wednesday evening, DH pipes up and says, "Our son needs a warm hat for this weekend, it's supposed to get chilly. Do you know where DD's green knit hat is?". Actually, the green hat is crocheted, not knitted, but how's DH to know? I told him I did
 n't know where it was. The conversation continued and I ended up with another item on my sewing to-do list.
Luckily, it was a very small item and only took a couple of evenings to get made up. It's the hat from the same McCall's pattern (4234) I used to make the kids' fleece camp pants. It turned out to be really quick and easy - and fairly cute.
Lessons Learned: The use of kids' washable markers on fleece fabric for making pattern marks is not really recommended.
I tried out one of the kid's washable markers to mark the fleece with. I don't think I'll do that again. Although the marks stayed better than chalk marks, the ink rubbed off all over my fingers as I was working with the fabric. That, and now we have to wash the hat to get the marks off, rather than brushing the chalk marks off. Ah well - can't know if something will work until you try it!!!
When DH and DD saw DS wearing his, they said they wanted one too. "NOT UNTIL I GET TO WORK MORE ON MY JACKET!!!!", says I. ;)
Monday, December 25, 2006
Interlude #2 - The Snuglet Adventure Continues...
Boy! Keeping up with timely posts is harder than I thought!!
I've now made a total of 8 snuglets. Along the way, I experimented with different ways to get the corners done so that they 1) look nice and 2) aren't terribly thick to sew through.
I think I finally have it, although it took me a few tries to get there.Here's a rundown of the progression:
Snuglet #2: At first I tried a mitering technique that's in the Reader's Digest New Complete Guide to Sewing. The mitering part worked just fine. However, their technique, as written, didn't allow me to double fold the edges - they were folded once only. Since I had gotten in my head that I wanted the raw edges bound, this wasn't going to work. (And I'll be the first to admit that I'm probably being overly picky about the whole raw edge thing).
The corners on this one ended up being sort of mitered because I had to cut the one of the corners to do the experiment. I cut each of the corners, then folded the edges twice. The result was that the corners fit nicely, but with a bit of a gap in the corner where one fold met the other fold. This as opposed to the nicely sewn corner that the original mitering technique would have given. To fix this, I stitched the two edges together and in such a way that it showed on the right side.
Here's the corner as seen from the wrong side:
Here's the corner as seen from the right side:
All in all, not perfect, but doable.
Snuglet #3: With this one, I set aside the mitering idea and played with cutting out some of the corner so that they could be folded without overlapping in the corners. This idea mostly worked. However, it also had a gap in the corner area that had to be sewn up.

Snuglet #4: I went back to the mitering idea but this time, tried to come up with a way where I could get the mitered corner sewn nicely AND get the edges double folded. And HEY! I figured it out! In short, the way to do it is to partially sew up the corner, then leave the rest to be folded under.

Whew!!!